A Geographically Distributed Retro LAN with pfSense and FreshTomato
The Retro LAN
I have a long time friend from college who got me into the retro computing hobby. He lives in Florida and I live in New York. This post describes how we're able to play on our 90s laptops together as if we were on the same network despite being in different states.
Let's back up a little. What does "retro LAN" even mean? My definition is a network solely dedicated to connecting old computers with each other. Since "old" is subjective, the definition here encompasses any computer that can connect via IEEE 802.3 Ethernet via RJ45 cable or 802.11 WiFi. For my friend and I, that includes Macintosh and PC laptops from the 90s, PowerPC Macs from the early 2000s, and Windows XP laptops.
What does one do with a retro LAN? In our case we have and will:
- Chat with Microsoft NetMeeting on Windows 98 (have)
- Screen share and remote control each other's Windows 98 machines via NetMeeting (have)
- Share files between Windows 98 machines via workgroup file sharing (have)
- Video conference with iChat on OS X 10.3 - 10.5 (have)
- Playing multiplayer games via TCP/IP and IPX (have)
- Setting up old-school Win NT and/or Novell NetWare servers and having clients connect to them (will)
Requirements
The way to bridge two remote networks is obvious. Use a VPN. But VPNs are complex and old operating systems do not support modern encryption standards. What we wanted was something that is:
- Always on
- Would not require a VPN client to run on the retro machines. Even if they could; the CPU overhead is too much
- Maintenance free
- Runs at the Ethernet layer (layer 2) and not the IP layer (layer 3). That allows for non-IP-based protocols to work, like IPX and AppleTalk.
- Isolated from our main networks for security reasons. It should be a completely isolated bastion of vulnerable retro goodness.
- For the VPN Client to be "portable" with the exception of needing a power cable.
The Tech
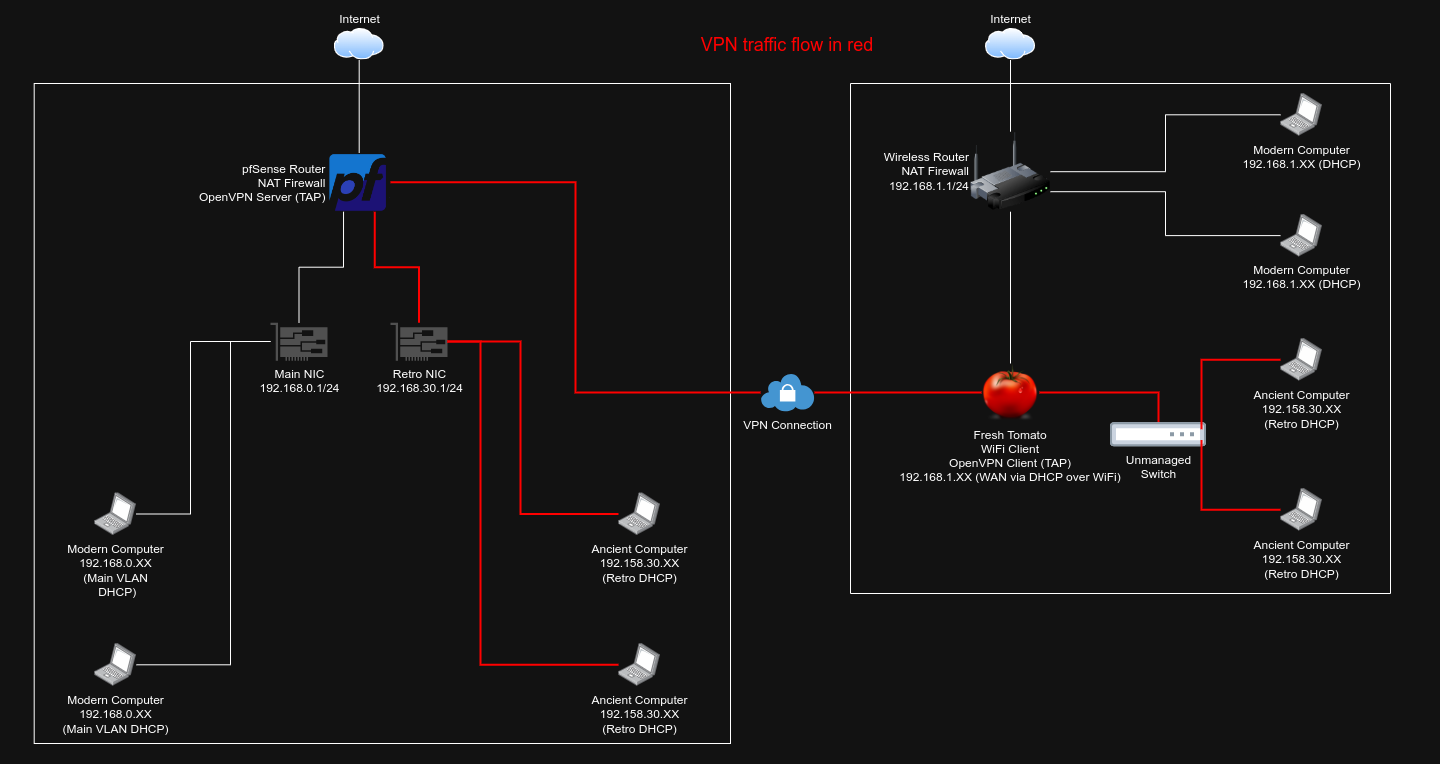
Because we want layer 2 connectivity, we settled on a TAP OpenVPN network. What follows is the whole tech stack diagrammed and explained, so get your propeller beanie cap out because this is going to get technical!
The tech and software stack we are working with is:
- pfSense router with 1 WAN and 3 LAN interfaces
- OpenVPN running directly on pfSense bridged to one of the interfaces
- A modded Netgear R7000 wireless router (fast, powerful, and super cheap on eBay!) running FreshTomato to act as a dedicated hardware OpenVPN client. Anything that plugs into it in Florida will instantly be on the retro LAN in New York.
The end result looks like this. Click for the full size version.

Assumptions
This guide assumes some working knowledge of:
- OpenVPN Servers and Clients
- Router Modding with alternate firmware
pfSense
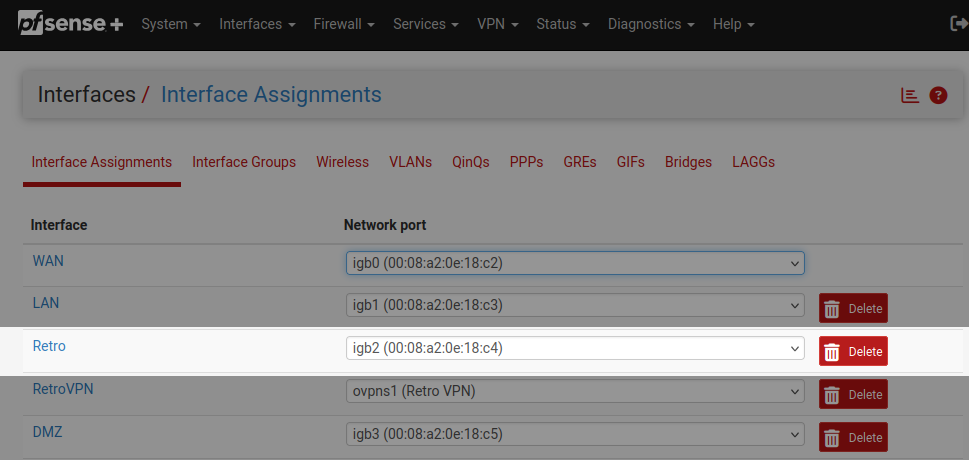
On the pfSense box go to Interfaces > Assignments, create an interface called "retro", and assign it to an unused physical interface. We're using a dedicated interface because that lets us isolate the traffic from the rest of the network.
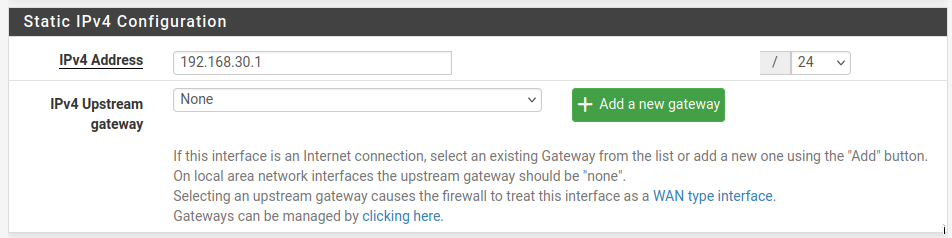
pfSense Interface Settings
The retro interface needs an IP address. I chose 192.168.30.1
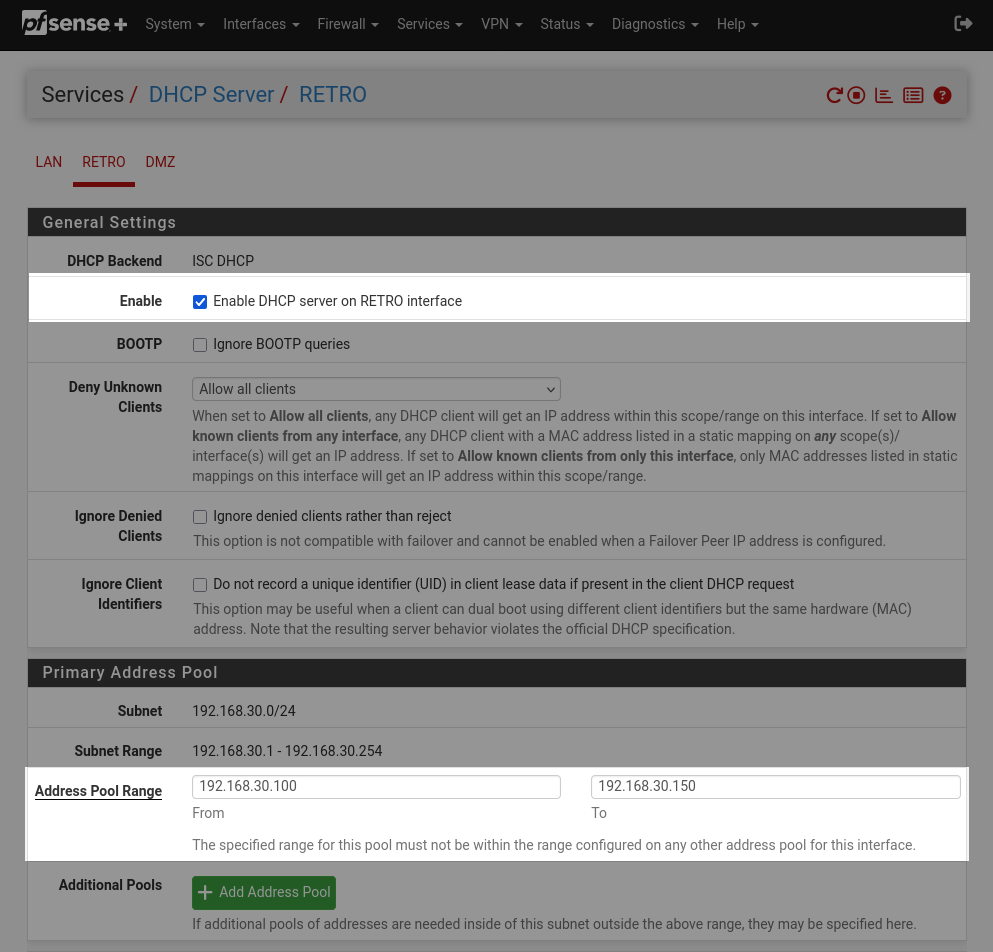
Be sure to enable DHCP for this interface and set an IP range. This will be one of two IP ranges that will be in the same subnet but will not overlap. I chose 192.168.30.100 - 192.168.30.150.
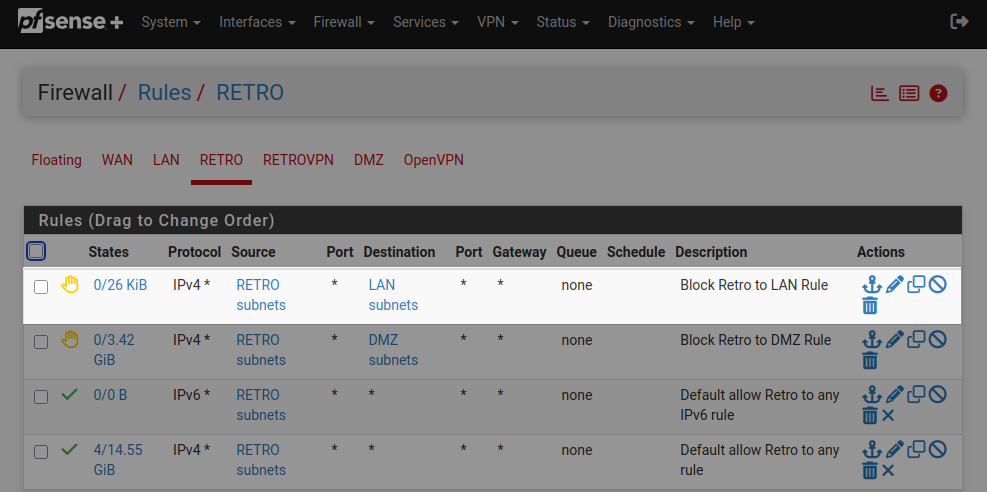
pfSense Firewall Rules
Now we need to set up firewall rules to prevent access between the retro and main LANs. In pfSense, go to Firewall > Rules. For the retro interface, we need a rule that blocks all traffic from the retro subnets to the main LAN subnets.
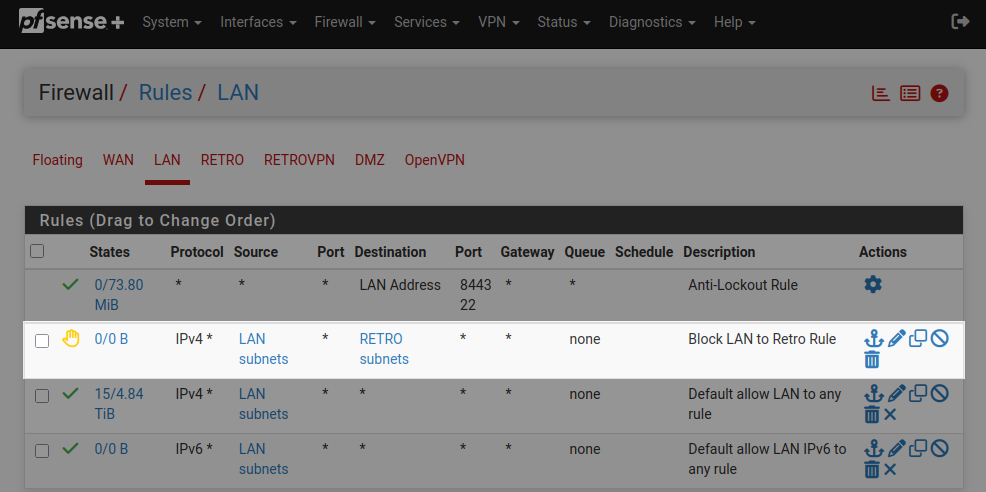
Next we need a firewall rule under the main LAN interface that blocks all traffic from the main LAN subnets to the retro subnets.
pfSense VPN Server
Now that the interfaces are created, it's time to set up the VPN server. This guide assumes some level of knowledge with OpenVPN. It is a complicated topic and its setup and administration would make this post far longer than it already is.
pfSense has plenty of documentation on the topic which will walk you through pfSense's VPN wizard, certificate authority, and user certificate setup. I suggest starting with this guide, getting a VPN up and working first, and then modifying it for use with the retro LAN. The latter is what we will be covering here, however you can see my entire VPN setup here for reference.
- Device Mode needs to be set to tap - Layer 2 Tap Mode

- Set Bridge Interface to the Retro interface we created earlier. We will need to manually create the bridge separately in a later step.

- Set Server Bridge DHCP Start and Server Bridge DHCP End. Make the subnet the same one from earlier (192.168.30.*) but make sure it's in a non-overlapping range. I chose 192.168.30.50 - 192.168.30.99. There may be a better way to do this but I could not figure out how to get the DHCP IP range settings from earlier to apply.

- Enable Inter-client Communication

- Enable DNS Default Domain and provide a value for DNS Default Domain. I chose Cloudflare's 1.1.1.1. It might be possible to pass DNS requests through the VPN server to the DNS server listening on 192.168.30.1 for the clients but I was not able to figure it out and it wasn't that important to do so.

pfSense OpenVPN Client Bridge
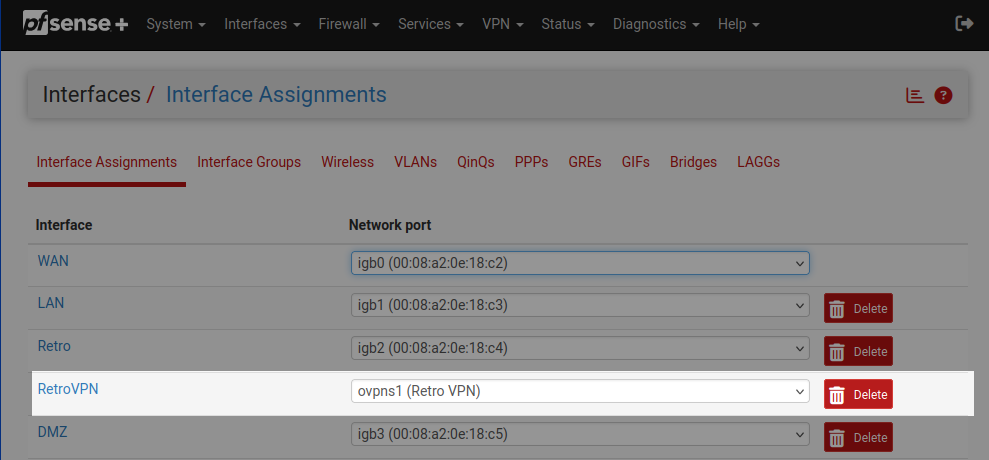
Back on the Interface Assignments Page, create new interface and assign it to ovpns1 (Retro VPN).
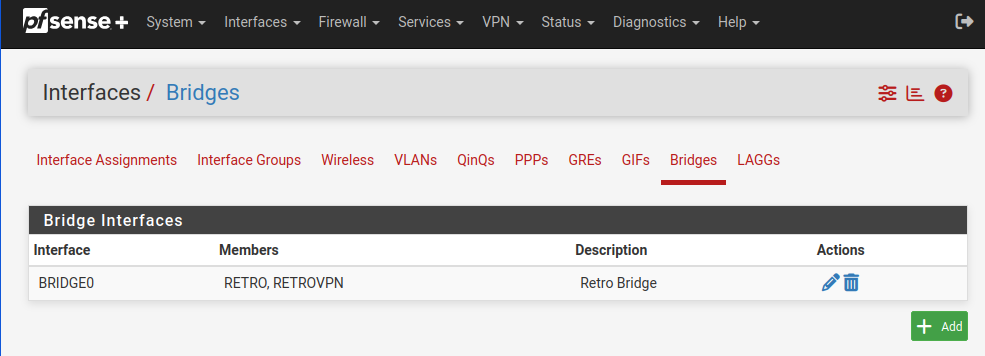
Under Interfaces > Bridges create a new bridge with the RETRO and RETROVPN as the members.
pfSense User Creation
A user will have to be created in order to log into the VPN server. I chose to use pfSense's local user manager. This is done simply by going to System > User Manager, creating one, and assigning a password.
pfSense VPN Client Export
In preparation for setting up the VPN client, we need to export the client config for later reference. Before this can be done, the openvpn-client-export package must be installed. Go to System > Package Manager and install it.
Now go to VPN > OpenVPN > Client Export, scroll down to the OpenVPN Clients section, and export the Most Clients option. It should download a file ending in ".ovpn". Open the file in a text editor and keep it for future reference.
FreshTomato on the Netgear R7000
Now it is time to set up our magic remote retro LAN client box. For this, I am using a Netgear R7000 (aka AC1900), 802.11 AC WiFi Router. It has more than enough processing power for this use, is very easy to mod, and is reliable in my experience. At the time of writing, they cost $15-$20 on eBay. The end result will be a box that connects to your existing WiFi network, connects to the VPN server, and is isolated from the rest of network it resides on. We will be assuming that the setup for this will be done on a network external to the one that pfSense is on.
Now we need to replace the firmware on it to give us the features we need. We will be using FreshTomato which, at the time of writing, is still actively developed and includes an OpenVPN client. This will not be a guide on how to flash and setup FreshTomato as they have their own documentation. I can tell you that I am using freshtomato-R7000-K26ARM-2025.2-AIO-64K.zip where the "AIO" means "all-in-one" and includes the OpenVPN client. Be sure to select the right firmware for your router or you may brick it.
I suggest getting to the where you can log into the FreshTomato admin page via a wired connection, and then coming back to this guide. Do NOT try configuring Tomato via a wireless connection as you won't be able to log back into it with the changes we are about to make.
FreshTomato Wireless Client Mode
In order to connect to the VPN, FreshTomato has to be connected to the internet. There are two options here.
- Connect the Netgear's WAN port into an existing switch on your network.
- Connect use a WiFi network as FreshTomato's WAN.
We will be doing option 2. In the FreshTomato admin, go to Basic > Network. Set "Wireless Client Mode" to either the 2.4 GHz or 5 GHz radio depending on your existing network setup. You can only use one. Then set a LAN IP to something outside of your local network's subnet and disable the DHCP server. I chose 10.0.0.1. Do not save yet.
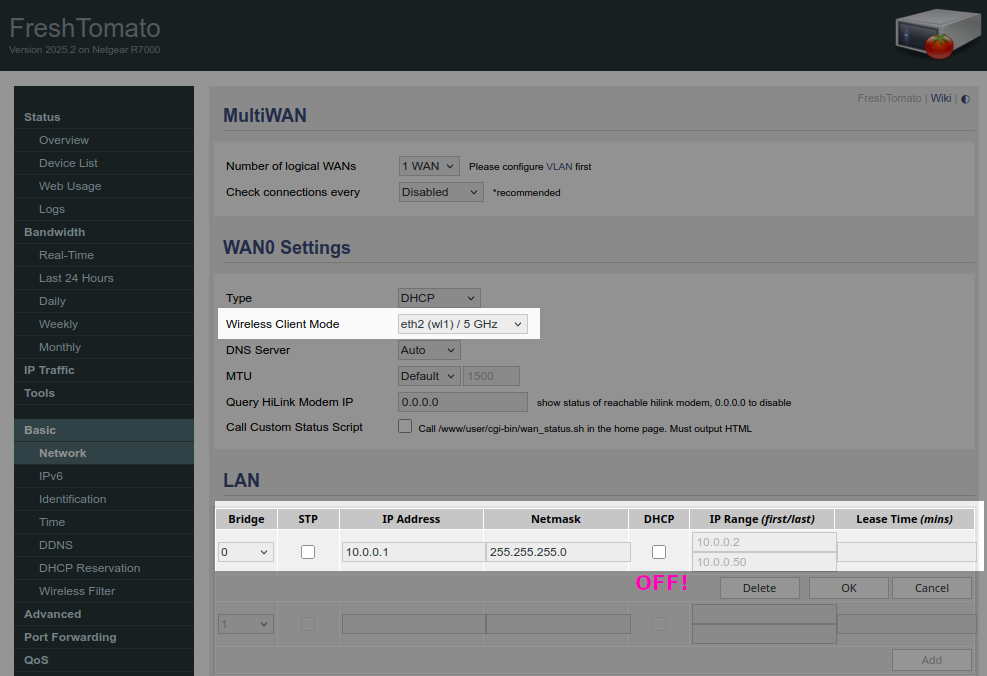
Scroll down to the interface you selected to use as a wireless client. Set Wireless Network Mode to Wireless Client. Then put in the SSID and security credentials of your existing wireless network. Then disable the other wireless radio so it is no longer broadcasting.

Now save.
Next, on the computer you are using to connect to FreshTomato, set your wired connection to have a static IP of 10.0.0.5. This is necessary since we disabled the DHCP server. Then navigate to 10.0.0.1 and you should be back at the admin interface.
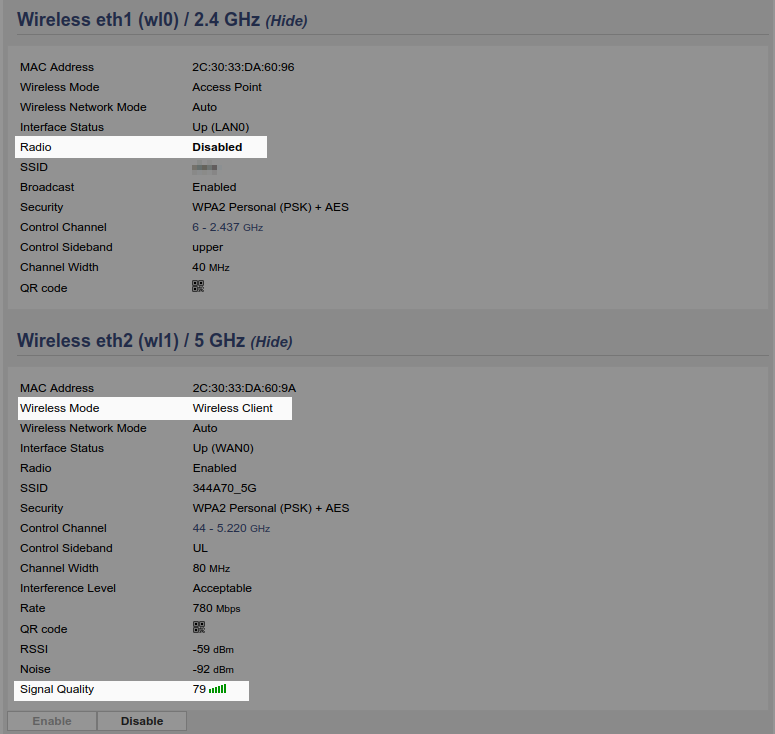
Now go to Status > Overview and verify that one radio is disabled and the other is successfully connected. You will know if it made a connection if you see a value for Signal Quality
Now go to Status > Overview and verify that one radio is disabled, that the other is wireless client mode and is successfully connected. You will know if it made a connection if you see a value for Signal Quality.
FreshTomato VPN Client
Now for the hard part. We are ready to make our VPN client connection. Go to VPN > OpenVPN Client. We will now be referencing the ovpn config file we downloaded from pfSense earlier.
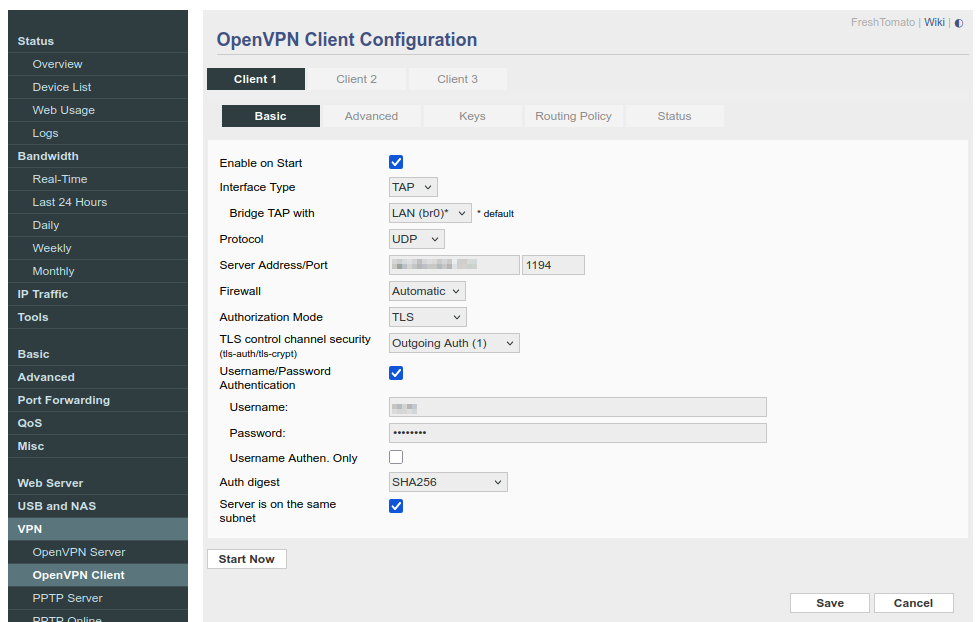
The next part will assume your OpenVPN server has the same auth and cipher settings as mine. If not, update accordingly. Under Client 1's Basic settings set:
- Enable on Start: Enabled
- Interface Type: TAP
- Bridge TAP with: LAN (br0) (This corresponds to LAN1 on the back of the router).
- Protocol: UDP
- Server Address/Port: Use the IP address from the OpenVPN config we previously downloaded. It will be the same as pfSense's WAN IP. Use 1194 for the port.
- Firewall: Automatic
- Authorization Mode: TLS
- TLS control channel security: Outgoing Auth (1)
- Username/Password Authentication: Enabled
- Username: The name of the user created in the "pfSense User Creation" step above.
- Password: The password of the user created in the "pfSense User Creation" step above.
- Username Authen. Only: Disabled
- Auth digest: SHA256
- Server is on the same subnet: Enabled
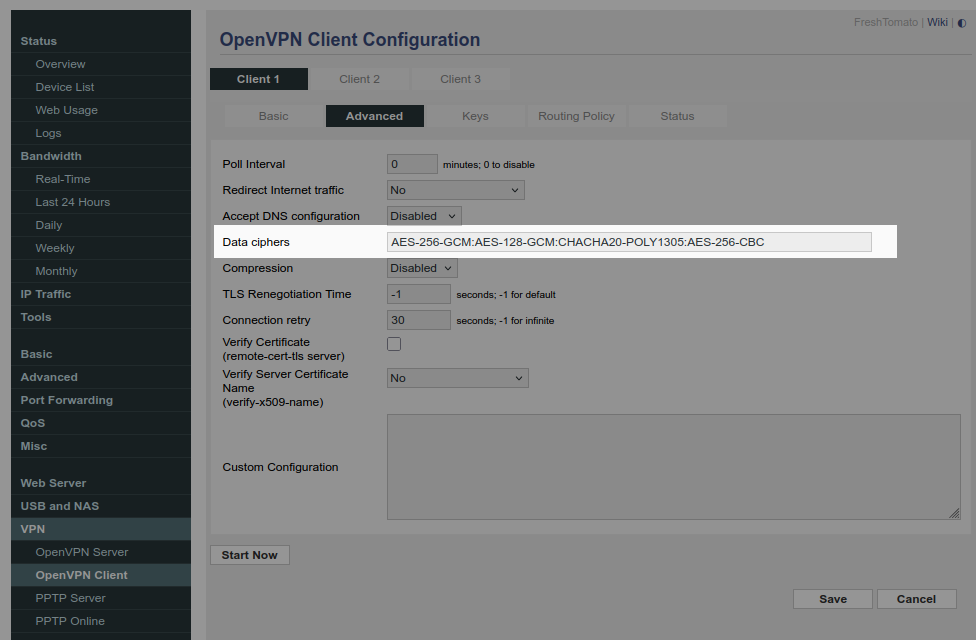
Go to the Advanced tab for the OpenVPN client config. I left everything as the default with the exception of setting the ciphers to match pfSense's OpenVPN server settings.
- Data ciphers: AES-256-GCM:AES-128-GCM:CHACHA20-POLY1305:AES-256-CBC
Go to the Keys tab for the OpenVPN client config. We will be referencing the ovpn config we previously downloaded.
- Static Key: Copy and paste from -----BEGIN OpenVPN Static key V1----- to -----END OpenVPN Static key V1-----
- Certificate Authority: Look for the <ca> section then from under it copy and paste from -----BEGIN CERTIFICATE----- to -----END CERTIFICATE-----.
- Client Certificate: Look for the <cert> section then from under it copy and paste from -----BEGIN CERTIFICATE----- to -----END CERTIFICATE-----.
- Client Key: Copy and paste from -----BEGIN PRIVATE KEY----- to -----END PRIVATE KEY-----
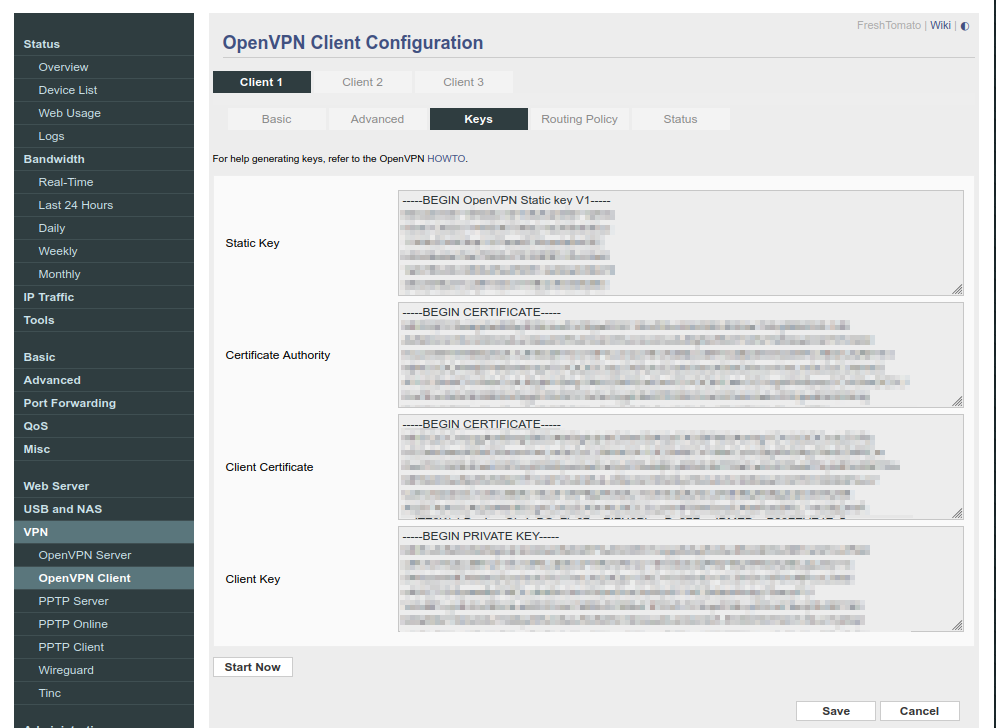
Save then hit that Start Now button!
Status and Debugging
Back in the pfSense admin page, go to Status OpenVPN. You should see a connected client.
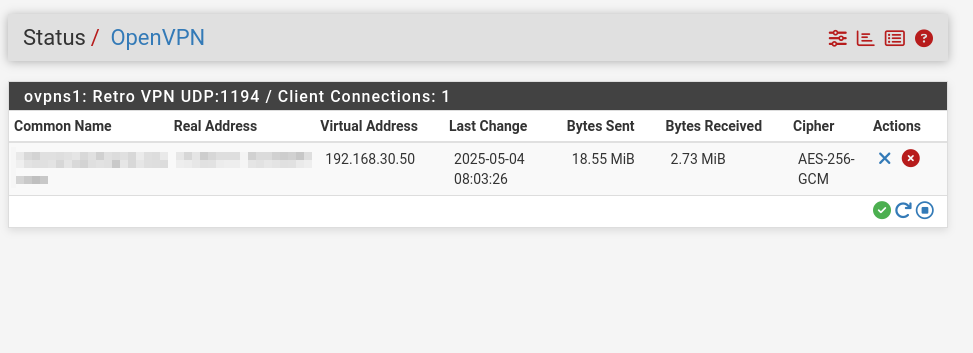
If you do not see a client, it is time to troubleshoot. The best place to do this is under Status > System Logs > OpenVPN. Look for any errors, search for the error message in your favorite search engine or LLM, correct them, and try again.
Testing Your Work
It is time to plug a network cable into the FreshTomato device. This will only work by plugging into LAN1 as that is the port the TAP connection is bridged to. Upon plugging in, the machine should receive an address in the 192.168.30.* range.
Congratulations! That FreshTomato router is now a maintenance free, remote gateway to your very own retro LAN. Because the client's existing WiFi network is its WAN, it is isolated from everything else on the main network it is connected to. Because of the separate interface and firewall rules on pfSense, the retro LAN is isolated from any other network as well. You are now safe from Blaster Worms and ILOVEYOU viruses!
Have fun!
Want to discuss? Email me at blog@pipetogrep.org.